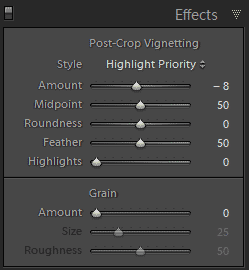
 If you have been using Lightroom 3 (and now Lightroom 4), you may have noticed Post-Crop Vignetting in the Effects panel. You can also find it in Photoshop nowadays as well.
Lightroom brings in a nice feature within the Effects panel with Post-Crop Vignetting: Style presets.
There are a few options here:
- Color Priority
- Highlight Priority
- Paint Overlay.
I find Highlight Priority to be slightly less subtle than Color Priority, so I would use Color Priority a bit more. However, Highlight Priority preset is better at recovering highlights in the images, obviously.
In this case, when you work with highlights that you want to recover, Highlight Priority would be the best choice. Keep in mind one thing, though, Highlight Priority may show some colour shifts, especially in darker areas.
Both of these styles work a but like the Exposure slider, especially when compared to the Paint Overlay preset.
If you’re going to use the styles quite a lot, why not create your own preset after customising the settings, so that later on you could save them and preview them in the Navigator panel! 😉
Just a quick tip for you that I thought I would share with you today. I hope you are going to put it to good use.
Enjoy! 🙂
